
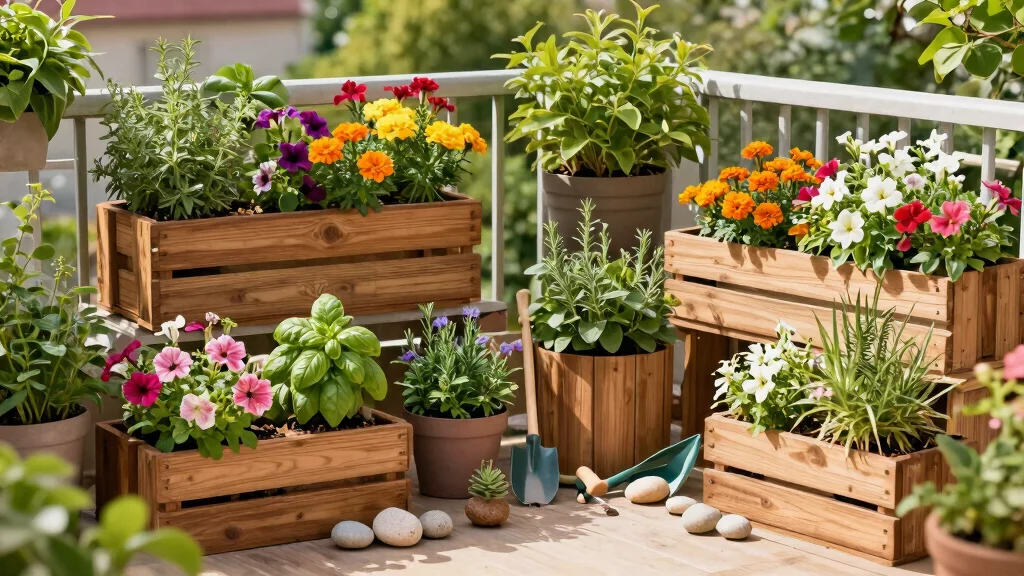
Creating a beautiful outdoor space can feel overwhelming, especially when it comes to finding the right planters. If you’ve been craving stunning garden decor but worry about costs, you’re in the right place. This post is designed to help you create gorgeous, large outdoor planters that not only fit your budget but also look like they belong in a high-end garden.
If you’re someone who loves gardening but wants to keep expenses low, this guide is for you. Whether you’re a seasoned green thumb or just starting, you can easily transform ordinary materials into extraordinary planters. You’ll discover DIY ideas that are affordable yet striking, making your garden the envy of your neighborhood.
In this post, you’ll find ten creative DIY large outdoor planters that cost almost nothing but give off an air of elegance. From rustic wooden pallet planters to vintage suitcases turned into leafy displays, each project offers detailed instructions and inspiration. Prepare to be amazed at how easily you can elevate your outdoor space without breaking the bank!
Key Takeaways
– You’ll learn how to create stunning large planters using inexpensive or upcycled materials, making gardening both affordable and stylish.
– The guide includes ten unique DIY planter ideas, each with clear instructions to help you execute them effortlessly.
– Discover practical tips on sourcing materials and tools, allowing you to get started on your gardening projects without a hefty investment.
– Each planter design is crafted to enhance your outdoor space, offering both functionality and aesthetic appeal.
– Even if you’re new to gardening or DIY projects, these ideas are manageable and encourage creativity while keeping costs low.
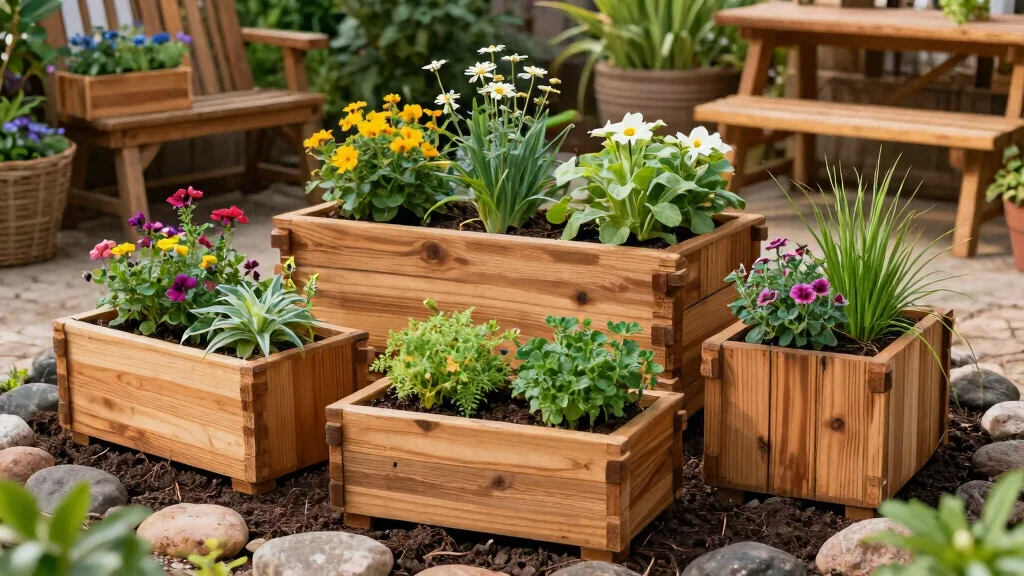
1. Rustic Wooden Pallet Planter

Are you looking to elevate your garden with a touch of rustic charm? Transforming old wooden pallets into planters is a chic and budget-friendly solution. These planters can be customized with vibrant colors or left in their natural state, making them suitable for any outdoor space. Plus, they offer a unique, handcrafted appeal that adds character to your garden.
Start by breaking down the pallets into manageable pieces and choosing a design that fits your area. For smaller spaces, a vertical planter works beautifully, while a long, low box suits larger areas perfectly. Sand down any rough edges to avoid splinters, then line the inside with landscaping fabric to retain moisture and prevent weeds.
Steps to create your rustic planter:
– Break down pallets into usable sections
– Choose a design that fits your space
– Line the inside with landscaping fabric
– Fill with soil and your favorite plants
This DIY project provides an eco-friendly way to enhance your garden aesthetics without breaking the bank. You’ll be proud of your stunning new addition that mirrors the look of high-end planters.
📹 Related Video: How to Build a Mini RAISED BED Using ONE PALLET, FREE Backyard Gardening!
Rustic Wooden Pallet Planter
Editor’s Choice
Weysat 16 Pcs Aquatic Plant Pots 6 Inch Round Pond Plant Baskets Net Pot…

HOPE’S 100% Pure Tung Oil, Food Safe, Premium Waterproof Natural Wood Fi…

Burpee, 9 Quarts | Premium Organic Potting Natural Soil Mix Food Ideal f…
2. Upcycled Metal Tubs

Looking for a vintage touch for your garden? Upcycled metal tubs can effortlessly elevate your outdoor decor while being incredibly affordable. These charming containers often feature a unique patina, adding character to your space and making them a focal point.
To create your metal tub planter, begin by cleaning out any debris and filling it with potting soil and your choice of plants. Whether you opt for fragrant herbs or colorful annuals, these tubs make a delightful addition. Make sure to drill drainage holes in the base to keep your plants thriving.
Helpful tips for your tub planter:
– Clean and prepare the tub for planting
– Choose plants that thrive in your climate
– Group different-sized tubs for visual interest
This stylish option not only enhances your garden but also allows you to express your creativity while staying budget-conscious.
Upcycled Metal Tubs
Editor’s Choice

Premium Potting Soil Mix with Peat Moss, Vermiculite, Perlite (Made in U…

Behrens 2GS 15 Gallon Round Galvanized Steel Tub
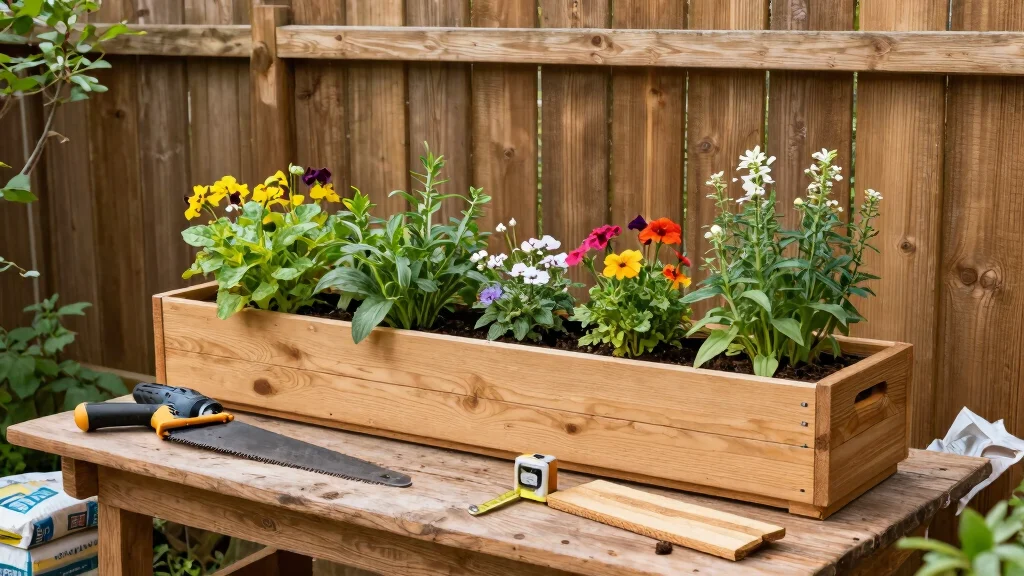
3. Repurposed Wooden Crates
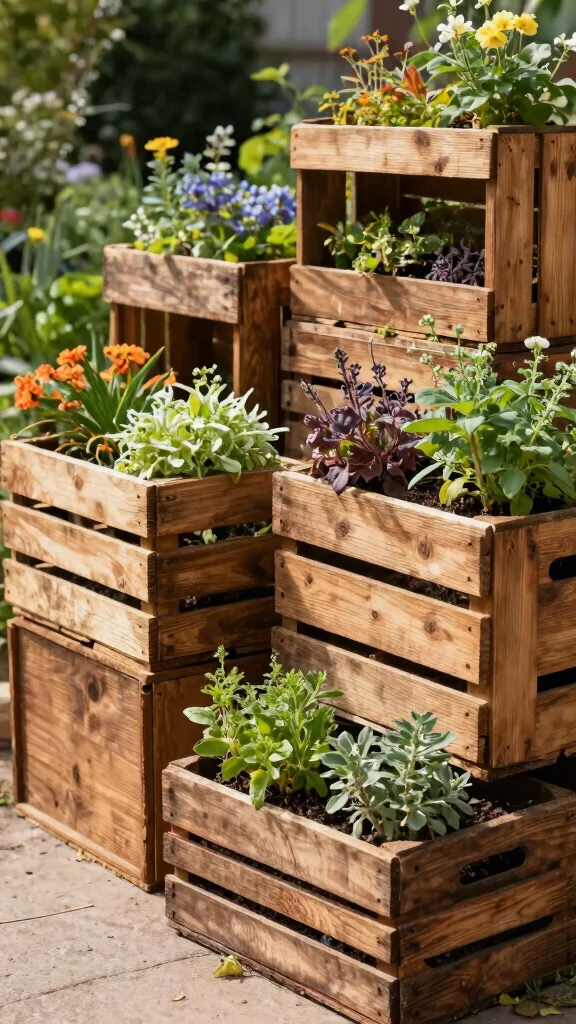
Do you have old wooden crates lying around? With a bit of creativity, these can be transformed into stunning planters that add a rustic aesthetic to your garden. Versatile and charming, they can be stacked or used individually to suit your design.
Start by staining or painting the crates to align with your garden’s theme. Adding a plastic liner will help with moisture retention, while filling it with soil allows for a variety of plants, from herbs to succulents. For a creative touch, attach chicken wire to the sides for climbing plants, creating a vibrant living wall.
Ideas to enhance your crate planters:
– Stain or paint to match your garden style
– Line with plastic to retain moisture
– Stack crates for height and visual interest
This charming approach gives your outdoor space a welcoming feel, allowing you to showcase your favorite plants beautifully.
How To Choose the Right DIY Large Outdoor Planter
Choosing the right DIY large outdoor planter can transform your garden space without breaking the bank. Here are some key criteria to consider when embarking on this creative journey.
1. Size Matters
When selecting a planter, think about the size you need based on the plants you want to grow. Larger plants, like shrubs or small trees, require bigger containers to allow for root growth. Measure the space where you plan to place the planter to ensure a good fit. A planter that’s too small will limit plant health, while one that’s too large might overpower your garden design.
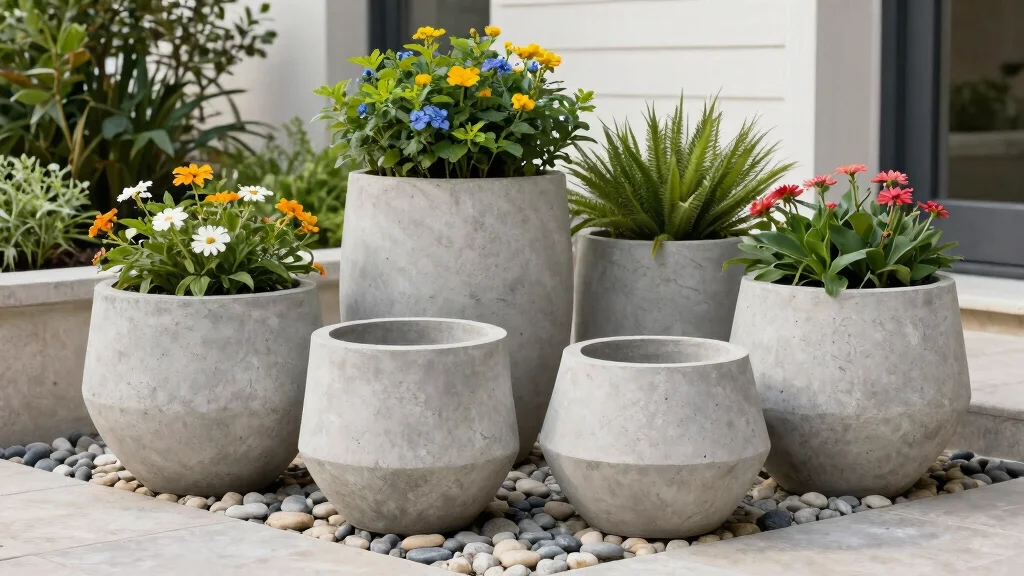
2. Material Selection
Different materials can dramatically change the look and durability of your planters. Wood, metal, and concrete are popular choices for DIY projects. Wooden planters offer a rustic vibe but may require treatment to prevent rot. Metal containers, like old tubs, can give a vintage feel and are highly durable. Concrete is sturdy and can be made into unique shapes but is heavier and less portable.
3. Drainage Features
Good drainage is crucial for plant health. Ensure your DIY planter includes drainage holes at the bottom. If you’re using a solid container, consider adding pebbles or stones at the base to promote water flow. Plants sitting in water can lead to root rot, so check that your design allows excess water to escape efficiently.
4. Style & Aesthetics
Your planter should complement your garden’s overall style. Think about the color, shape, and finish of your planter. A sleek concrete design can fit modern settings, while a rustic wooden planter suits a cottage-style garden. Look for ways to incorporate your planter’s design into your landscape to create a cohesive look.
5. Budget-Friendly Options
Since you want to create something inexpensive, explore materials you already have at home. Repurposing items like wooden pallets or old metal containers can save you money and add character to your garden. Set a budget before you start, and look for materials that won’t stretch your finances too thin.
6. Plant Compatibility
Finally, consider what types of plants you want in your DIY planter. Some plants thrive in larger pots, while others prefer smaller ones. Make sure the planter’s size and depth match the needs of your chosen plants. Also, think about sunlight exposure and watering needs to ensure your plants flourish.
Pro Tip: Before committing to a final design, sketch out your planter ideas and visualize how they will look in your space. This can help you make adjustments early on, ensuring that your DIY project turns out just as you envision it!
Repurposed Wooden Crates
Editor’s Choice

SupKing 6 Pack Plant Saucers Drip Tray,6 8 10 12 14 15 Inch Heavy Sturdy…

2lb Bonsai Succulent and Cactus Soil Boniosz Gritty Mix Rocks Faster Dra…

Wood Stain, 16 Oz Water Based Wood Stain and Sealer in One – No Priming,…
4. Terracotta Pot Stacking
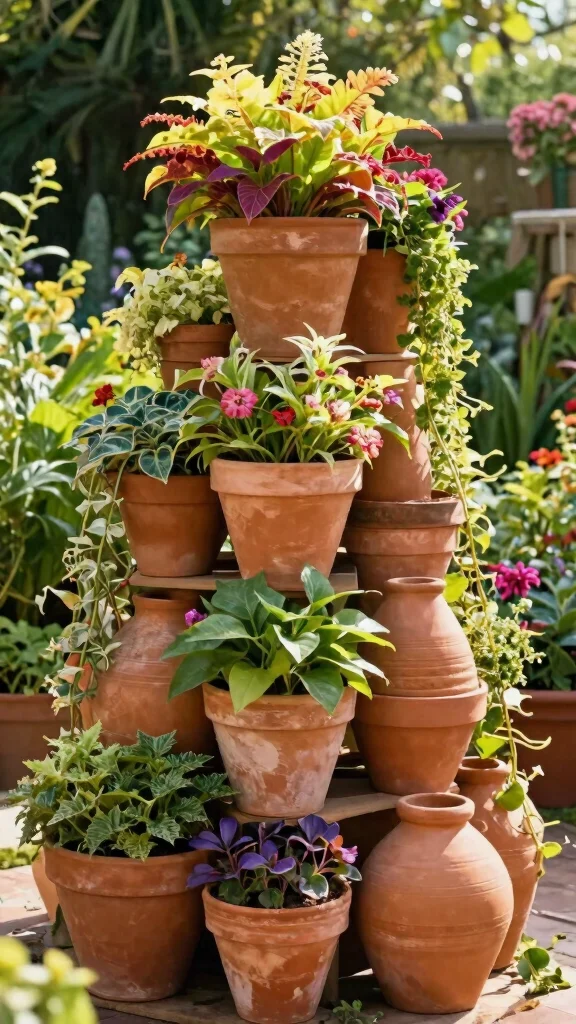
Want to create a stunning focal point in your garden? Stacking terracotta pots is a creative way to add height and visual interest. By using pots in various sizes, you can achieve a unique look that enhances your outdoor aesthetics.
Start with pots that have drainage holes and stack them with the largest at the bottom for stability. Fill each pot with soil and select plants that cascade down for a dramatic effect. For added personalization, consider painting the pots or leaving them in their natural terracotta finish for a classic vibe.
Key steps for stacking pots:
– Choose pots of different sizes
– Ensure every pot has drainage holes
– Fill with soil and select trailing plants
This DIY planter not only saves space but also transforms your garden into a vibrant showcase of plants.
Terracotta Pot Stacking
Editor’s Choice

Miracle-Gro Potting Mix – For Container Plants, Flowers, Vegetables, Shr…

11″H x 9.5″ Dia Aged Terracotta Clay Planter Pot with Drainage Hole, Rus…

Shuttle Art 12 Colors Acrylic Paint, 250ml/8.45oz Bottles Acrylic Paint …
5. Vintage Suitcases

Have some old vintage suitcases collecting dust? These quirky planters can add a fun, retro vibe to your garden. Not only are they unique, but they also make for great conversation starters.
Begin by drilling drainage holes in the bottom of the suitcase. After that, fill it with potting soil and choose your favorite plants to create a beautiful display. Mixing herbs with vibrant flowers can make a functional yet visually appealing planter.
Fun ideas for suitcase planters:
– Stack suitcases for a multi-tiered look
– Choose colorful plants for added interest
– Use as a focal point in your outdoor decor
This creative twist on gardening not only beautifies your space but also showcases your personality and style.
You might also like
Vintage Suitcases
Editor’s Choice

Miracle-Gro Organic Outdoor Potting Mix – Plant Soil for Outdoor Contain…
DEWALT 20V MAX Cordless Drill and Impact Driver, Power Tool Combo Kit , …

Live Aromatic and Edible Herb Assortment (Rosemary, Eucalyptus, Mint, Le…
6. Concrete Block Planters
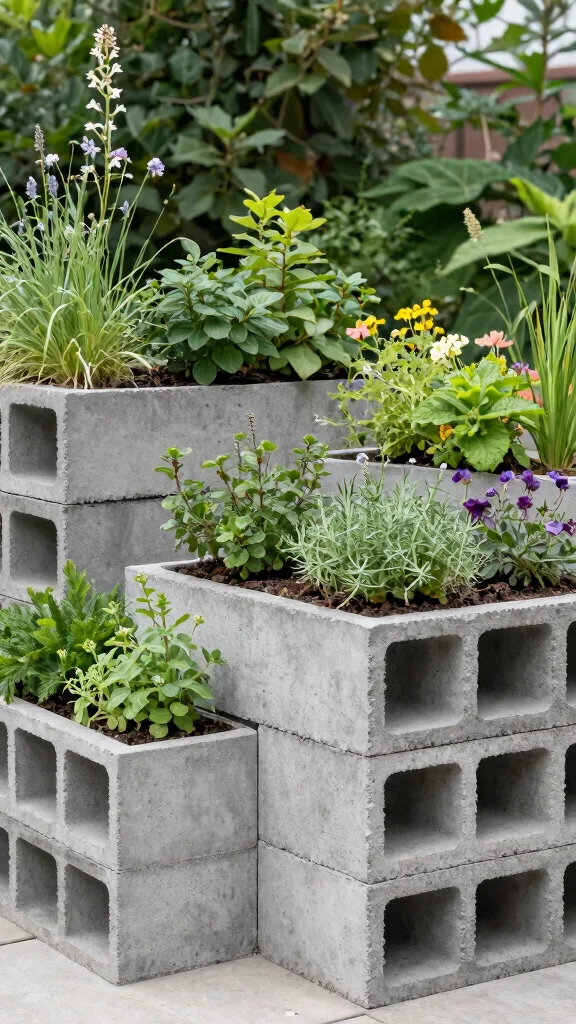
Looking for a modern planter solution? Concrete blocks provide a sturdy and stylish option for your garden. These blocks can be easily stacked to create unique designs that are both functional and attractive.
Each block features openings perfect for filling with soil and plants, allowing for a variety of planting options. Consider using herbs in the individual holes for a vertical garden or larger plants in the top sections for a lush display.
Customization ideas for concrete blocks:
– Paint the blocks to match your garden style
– Add decorative stones for added texture
– Use them creatively in small or large spaces
This design is ideal for urban gardens, allowing you to maximize space and create a contemporary feel.
Fun fact: 8 concrete blocks can form a 3-tier planter for under $25. Stack them into modern, modular beds and fill each hole with herbs for a vertical garden or top-level plants for a lush focal point. It proves you can DIY large planters outdoor cheap while keeping style high.
Concrete Block Planters
Editor’s Choice
Miracle-Gro Organic Outdoor Potting Mix – Plant Soil for Outdoor Contain…

Garden Tools Set, 3 Pack Heavy Duty Gardening Tools Set Include Garden S…

DoubleFill 2 Pairs 4 Inch Line Blocks Masonry String Lines Concrete Bloc…
7. Hanging Basket Planters
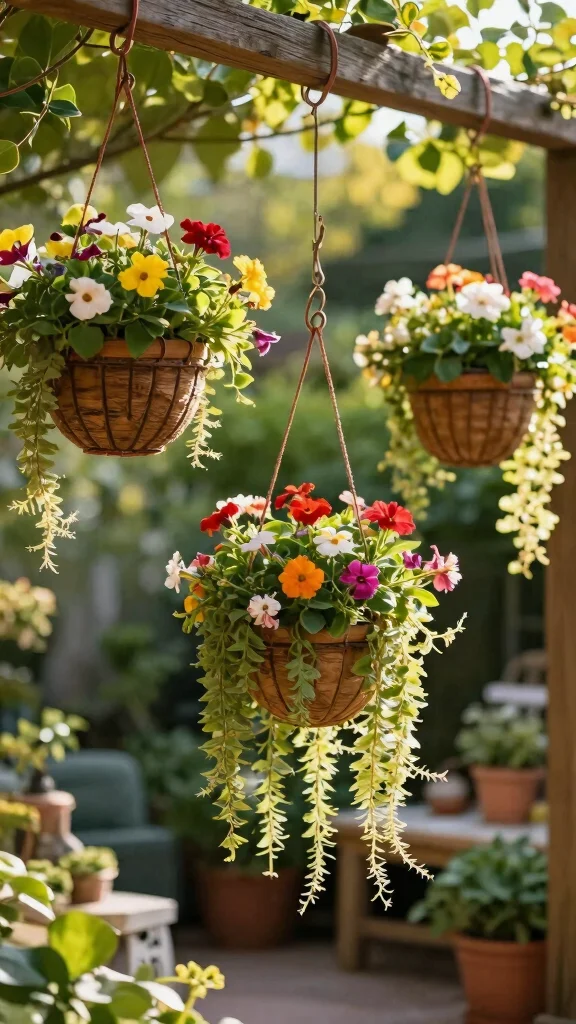
Want to draw the eye upward in your garden? Hanging planters are a fantastic way to add dimension without taking up ground space. You can create DIY hanging planters using materials like old colanders, baskets, or shoe organizers.
For colanders, simply drill drainage holes and fill them with soil and trailing plants like ivy. If using baskets, line them with coconut coir to keep the soil in place while allowing for drainage. Vary the heights of your hanging planters for an eye-catching display.
Tips for hanging planters:
– Use recycled materials for eco-friendly options
– Choose plants that cascade for visual interest
– Hang at different heights for a dynamic look
This approach not only saves space but also makes your garden feel more inviting and lively.
Fun fact: A single hanging basket can hold 3–5 plants, creating three tiers of color along your railing planters. Swap in seasonal blooms every 6–8 weeks to keep the display fresh and your deck feeling vibrant and inviting.
Hanging Basket Planters
Editor’s Choice

150+ Weeping Begonia Seeds | Cascading Hanging Flowers | Ornamental Gard…
Coco Coir Liner, Yarrdfir 16×120 inch Natural Coconut Liners for planter…
Auger Drill Bit for Planting 3 Pack with Extension – Spiral Hole Planter…
8. Reclaimed Wood Planter Boxes

Are you a DIY enthusiast looking for a sustainable option? Reclaimed wood offers a beautiful way to create sophisticated planter boxes that enhance your garden. Using old fence boards or pallets, you can build planters that exude warmth and character.
Assemble the wood into a box shape, ensuring proper drainage by drilling holes in the bottom. After filling with soil, plant vibrant blooms or herbs that thrive in their new home. For added protection, enhance the wood’s beauty with a clear sealer to keep it looking great.
Benefits of reclaimed wood planters:
– Eco-friendly option for gardening
– Adds rustic charm to your outdoor space
– Perfect for herbs, flowers, or vegetables
This DIY project infuses your garden with life and personality, making it a delightful space to enjoy.
You Might Also Like
Reclaimed Wood Planter Boxes
Editor’s Choice

WORKPRO 13-Piece Spade Drill Bit Set in SAE, Paddle Flat Bits for Woodwo…

Olympic WaterGuard 11 oz. Clear Exterior Waterproofing Wood Sealer Spray

3×1.8x1ft Raised Garden Bed Kit for Outdoors, Rustproof PP Raised Plante…
9. Wine Barrel Planters

Want to add a touch of rustic elegance to your garden? Old wine barrels make stunning and spacious planters. These large containers are perfect for a variety of plants and offer excellent drainage for healthy growth.
Start by cutting the barrel in half or leaving it whole for a grand display. Fill it with rich soil and your plant selections, from colorful flowers to hearty vegetables. For a polished finish, sand down rough edges and apply a food-safe sealant before planting.
Considerations for wine barrel planters:
– Use whole barrels for larger plants
– Cut in half for a tiered effect
– Surround with decorative stones for added charm
This option not only enhances your landscape but also serves as a stunning focal point in your garden.
Wine barrel planters prove you don’t need pricey pots to create a wow-factor garden. DIY large planters outdoor cheap let you maximize space, save money, and enjoy big, dramatic greenery.
Wine Barrel Planters
Editor’s Choice

Garden Box Sealer 32OZ/946ML, Non-Toxic & Plant-Safe Waterproofing Wood …
Miracle-Gro Organic Outdoor Potting Mix – Plant Soil for Outdoor Contain…

2 Liter Oak Aging Barrel with Wood Stand, Bung & Spigot – Mini Whiskey B…
10. Plastic Container Garden

Looking for a practical way to create large outdoor planters? Plastic containers offer a low-cost option that can be stylishly transformed with a bit of creativity. Many people overlook these containers, but they can be turned into charming garden accents.
Consider using large plastic storage bins or buckets for your planters. Just be sure to drill drainage holes in the bottom for healthy plants. You can paint them with outdoor-friendly paint for a pop of color or wrap them in twine for a rustic appearance.
Quick tips for plastic container gardens:
– Group containers for a cohesive look
– Experiment with different sizes and colors
– Fill with a variety of plants for visual appeal
This budget-friendly option allows you to express your creativity while building a vibrant garden atmosphere.
Plastic Container Garden
Editor’s Choice

PerkHomy Natural Jute Twine 600 Feet Long Twine String for Crafts Gift W…

GOTIDEAL Acrylic Paint Set with 10 Brushes, 18 Colors Outdoor/Indoor (59…

Sterilite 4-Pack Ultra Latching Box, Storage Bins with Lids, Clear Plast…
Conclusion

Creating large outdoor planters using upcycled materials not only saves money but also allows you to express your creativity. By utilizing these innovative DIY ideas, you can enhance your garden’s aesthetic without sacrificing quality or style. Whether you’re a gardening newbie or a seasoned pro, these projects offer something for everyone, turning your outdoor space into a beautiful retreat. Happy gardening!
Note: We aim to provide accurate product links, but some may occasionally expire or become unavailable. If this happens, please search directly on Amazon for the product or a suitable alternative.
This post contains Amazon affiliate links, meaning we may earn a small commission if you purchase through our links, at no extra cost to you.
Frequently Asked Questions
What are the best upcycled materials for DIY large planters that stay affordable and look premium?
Upcycled materials are perfect for diy large planters outdoor cheap that still feel high-end. Good options include pallets, repurposed wood crates, metal drums, cement blocks, and large plastic barrels. For any material, plan drainage, a waterproof liner, and weatherproofing. Quick build steps: clean and sand, line with a thick plastic liner, drill drainage holes, seal with exterior sealant, then finish with exterior paint or stain to elevate the look.
How can I create diy large planters outdoor cheap that still looks expensive?
Want diy large planters outdoor cheap but with premium vibes? Start with a cohesive color palette and simple finishes. Use exterior-grade paint or stain, add faux trim with inexpensive metal or rope, and hide edges with a liner and edging. Keep costs down by using two or three materials only, and anchor the space with a couple of large pots. Practical steps: pick your material, prime surfaces, apply 2 coats of exterior paint, add a protective top coat, fit a liner, and plant with bold, drought-tolerant specimens.
What sizes and designs work best for large outdoor containers on a budget?
For big impact on a budget, mix sizes and shapes. Try 18–24 inch tall rectangular troughs, 16–20 inch diameter round barrels, and 20–24 inch square crates. Use sturdy, rot-resistant materials, add a liner, and ensure good drainage. Designing with two or three sizes in tandem creates visual depth without breaking the bank. Quick planning tips: sketch layout first, then choose two materials that complement each other.
How do I weatherproof and maintain inexpensive planter designs for year-round outdoor use?
Weatherproofing is the key to longevity. Seal wood with exterior-grade sealant, use liners to protect wood from moisture, and pick UV-rated paints to prevent fading. Check drainage holes and clean out debris regularly, re-seal every season, and bring in or protect the most fragile setups during extreme weather. For maintenance, wipe down with mild soap, inspect for cracks, and refresh color every year or two to keep things looking fresh.
Where can I source affordable or free materials for DIY planter ideas?
Great news: there are plenty of sources for affordable or free materials. Look for curbside giveaways, pallets from local stores (with permission), construction-site leftovers, thrift shops, and recycling centers. Ask neighbors or friends—you’d be surprised what they’re willing to part with. Quick safety note: avoid treated wood or materials with toxic paints; always rinse and vet materials before use to ensure affordable garden planters stay safe for your plants.
Related Topics
diy large planters
outdoor gardening
upcycled materials
affordable garden planters
budget-friendly design
large outdoor containers
easy DIY projects
inexpensive planters
sustainable gardening
beginner friendly
creative planter ideas
garden decor